netty_reactor线程模型

Netty是一个封装了JAVA NIO的异步网络应用框架,它简化了我们网络编程,同时保证了高可用和高性能,因此我认为学习netty对以后深入一些RPC框架,或者接触一些网络通信都大有裨益。

今天就是想从源码角度学习一下nettyreactor线程模型,这应该是netty的核心之一,整篇文章包含的只是我作为一个初学者的粗浅见解,同时也借鉴了大量的博客文章,因此对部分内容认识不够深入,或者存在逻辑不通的情况,希望能够谅解。

Reactor简介

在接触netty之前,首先先介绍一些基础知识,让我们了解一下什么是Reactor模式

维基百科的解读如下

The reactor design pattern is an event handling pattern for handling service requests delivered concurrently to a service handler by one or more inputs. The service handler then demultiplexes the incoming requests and dispatches them synchronously to the associated request handlers.

翻译总结主要有这么几点

  • reactor是一种事件驱动的设计模式
  • reactor可以同步地接受多个输入源
  • reactor以多路复用的模式分发多个请求到对应的处理器上去

让我们拿实际情景做例子。

在传统BIO中,一旦遇到多个事件请求并发,事件监听器只会将后面的线程阻塞,等到当前线程处理结束后才能继续进行监听接受后续请求,这样会大大降低吞吐量,增大系统的负载,在高并发的场景下容易造成明显的数据延迟。

因此在NIO中将耗时的IO处理操作和请求的监听接受分离开来,由一个线程专门监听事件请求,当接受一个请求后再开启一条线程专门处理IO请求,从而主线程不阻塞,达到了非阻塞。

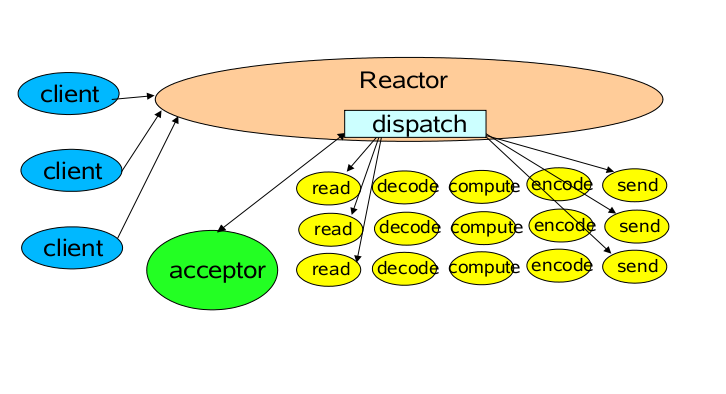
至此,Reactor的基本架构已经出来了,在上述文字中已经隐含了Reactor的三种基础角色:

  • Reactor 将I/O事件分派给对应的Handler
  • Acceptor 处理客户端新连接,并分派请求到处理器链中
  • Handlers 执行非阻塞读/写 任务

经典的reactor线程模型如图所示,

img

但是这只是最初级的架构,针对具体复杂的场景,还需要做出诸多优化,比如构建处理IO请求的线程池、将监听事件和分发事件进一步解耦、进一步减少资源开销等,这些在这里就不再展开了。

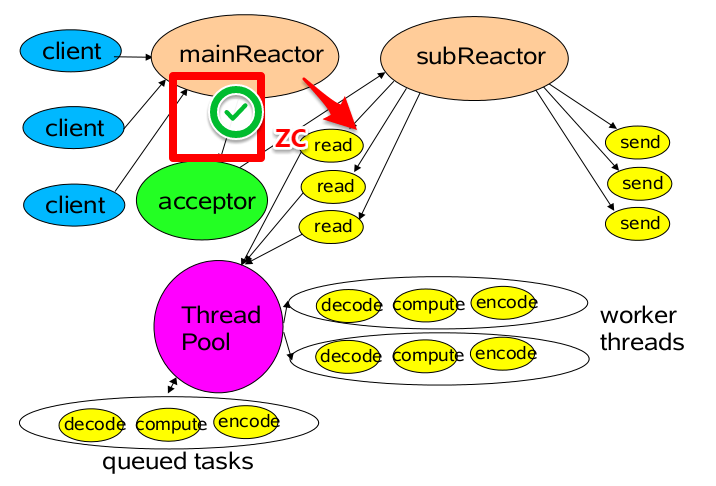
netty中核心的reactor线程模型就是一个相对更成熟和高性能的模型,它的架构更像是下图,是一个多reactor多线程的模型。

其中mainReactor 主要是用来处理网络IO 连接建立操作,通常一个线程就可以处理,而subReactor主要做和建立起来的socket做数据交互和事件业务处理操作,它的个数上一般是和CPU个数等同,每个subReactor一个线程来处理。

img

关于reactor模式的暂时就介绍这么多了,其实关于事件的处理还有其他的处理模式。在Douglas Schmidt的作品《POSA2》中提到了有四种事件处理模式:

  1. Reactor  
  2. Proactor  
  3. Asynchronous Completion Token  
  4. Acceptor-Connector

这些以后有时间再研究,今天就先专注netty的事件处理

Reacor线程的启动和创建

得益于netty良好的封装,使得我们只要接触过netty,相信都能直接感受其中reactor模式的存在,下面给一个简单的netty服务端的启动demo (本人环境 netty-all-4.1.48 )

1
2
3
4
5
6
7
8
9
10
11
12
13
14
15
16
17
18
19
20
21
22
23
24
25
26
27
public class NettyServer {
private final static int PORT = 8000;
public static void main(String[] args) {
//netty的启动引导类
ServerBootstrap serverBootstrap = new ServerBootstrap();

//绑定线程组,这时我们今天重点关注对象
NioEventLoopGroup boss = new NioEventLoopGroup();
NioEventLoopGroup worker = new NioEventLoopGroup();
//在引导类中配置相关选项,这些暂时不要去在意它
serverBootstrap
.group(boss,worker)
.option(ChannelOption.TCP_NODELAY,true)
.option(ChannelOption.SO_BACKLOG,1024)
.option(ChannelOption.SO_KEEPALIVE,true)
.channel(NioServerSocketChannel.class)
//添加事件处理类,就是reactor中的handler角色
.childHandler(new ChannelInitializer<NioSocketChannel>() {
@Override
protected void initChannel(NioSocketChannel ch) throws Exception {

ch.pipeline().addLast(new EchoHandler());

}
}).bind(port);
}
}

其中最重要的就是NioEventLoopGroup,因为在这里我们创建了事件的监听和分发器。那什么是NioEventLoopGroup呢?通过词义可以看到词根是EventLoop, 在Js中我们知道Eventloop就是Js的运行机制,是通过单线程循环调度处理事件,这其实也和reactor模式中用单线程监听接受事件非常相似,那再netty中是否就是这个意思呢?让我们先往下看

NioEventLoopGroup

因此,现在就让我们扒一扒NioEventLoopGroup的源码,看看里面做了什么。首先进入NioEventLoopGroup,发现它继承了MultithreadEventLoopGroup,先不急看父类,看一下它的构造函数:

1
2
3
4
5
6
7
8
9
10
11
12
13
14
public class NioEventLoopGroup extends MultithreadEventLoopGroup {

public NioEventLoopGroup() {
this(0);
}
//...省略中间若干个构造函数
//从第一个无参构造函数开始,发现最终到达了这个构造函数
public NioEventLoopGroup(...) {
super(nThreads, executor, new Object[]{selectorProvider, selectStrategyFactory, RejectedExecutionHandlers.reject()});
}

//...省略其他

}

观察一下其中的传入参数,其中大部分参数都被设置了默认值

  • nThreads :表示线程池中的线程数,注意这里的线程并非是我们常见的线程,大家先这个thread看成是某个实体,接下来会揭晓这个实体是什么
  • executor: 传入的线程池实例,这个暂时不表,只要知道是给上述那个实体用的
  • selectorProvider: 我们需要通过它来实例化 JDK 的 Selector,也就是说那个实体持有selector
  • selectStrategyFactory :关于selector如何select的策略,之后等揭晓了这个实体之后会做出解答

其他参数

  • chooserFactory: 选择从线程池中选择线程(那个实体)的策略
  • rejectedExecutionHandler: 线程池中出现拒绝执行时的策略, netty的默认拒绝策略是抛出异常

接下里我们进入父类查看构造方法

1
2
3
4
5
private static final int DEFAULT_EVENT_LOOP_THREADS = Math.max(1, 	SystemPropertyUtil.getInt("io.netty.eventLoopThreads", NettyRuntime.availableProcessors() * 2));
//看到nThreads如果没有被设置过就被初始化成核心数*2
protected MultithreadEventLoopGroup(int nThreads, ThreadFactory threadFactory, Object... args) {
super(nThreads == 0 ? DEFAULT_EVENT_LOOP_THREADS : nThreads, threadFactory, args);
}

继续进入父类查看

1
2
3
4
5
6
7
8
//进入下面的构造方法
protected MultithreadEventExecutorGroup(int nThreads, ThreadFactory threadFactory, Object... args) {
this(nThreads, (Executor)(threadFactory == null ? null : new ThreadPerTaskExecutor(threadFactory)), args);
}

protected MultithreadEventExecutorGroup(int nThreads, Executor executor, Object... args) {
this(nThreads, executor, DefaultEventExecutorChooserFactory.INSTANCE, args);
}

到这里MultithreadEventExecutorGroup会先设置一个ThreadPerTaskExecutor,就是上面所说的executor

再设置一个chooserFactory,用来实现在线程池中选择线程的选择策略,这部分代码比较简单,就不贴出来了

接着this()就会进入正式配置的构造方法

1
2
3
4
5
6
7
8
9
10
11
12
13
14
15
16
17
18
19
20
21
22
23
24
25
26
27
28
29
30
31
32
33
34
35
36
37
38
39
40
41
42
43
44
45
46
47
48
49
50
51
52
53
54
55
56
57
58
59
60
61
62
63
64
65
66
67
68
69
70
71
protected MultithreadEventExecutorGroup(int nThreads, Executor executor, EventExecutorChooserFactory chooserFactory, Object... args) {
//....
//将所有child实例化
for(int i = 0; i < nThreads; ++i) {
boolean success = false;
boolean var18 = false;

try {
var18 = true;
//注意这里,构造了一个线程池数组
this.children = new EventExecutor[nThreads];

int j;
for(int i = 0; i < nThreads; ++i) {
boolean success = false;
boolean var18 = false;

try {
var18 = true;
//实例化一个child
this.children[i] = this.newChild((Executor)executor, args);
success = true;
var18 = false;
} catch (Exception var19) {
throw new IllegalStateException("failed to create a child event loop", var19);
} finally {
//...

////这里指上面实例化child失败,执行下面逻辑
if (!success) {
for(j = 0; j < i; ++j) {
this.children[j].shutdownGracefully();
}

for(j = 0; j < i; ++j) {
EventExecutor e = this.children[j];

try {
while(!e.isTerminated()) {
e.awaitTermination(2147483647L, TimeUnit.SECONDS);
}
} catch (InterruptedException var22) {
Thread.currentThread().interrupt();
break;
}
}
}
}
//所有child都已经实例化
//设置线程选择策略
this.chooser = chooserFactory.newChooser(this.children);
//添加监听器,监听每个线程是否termination
FutureListener<Object> terminationListener = new FutureListener<Object>() {
public void operationComplete(Future<Object> future) throws Exception {
if (MultithreadEventExecutorGroup.this.terminatedChildren.incrementAndGet() == MultithreadEventExecutorGroup.this.children.length) {
MultithreadEventExecutorGroup.this.terminationFuture.setSuccess((Object)null);
}

}
};
EventExecutor[] var24 = this.children;
j = var24.length;

for(int var26 = 0; var26 < j; ++var26) {
EventExecutor e = var24[var26];
e.terminationFuture().addListener(terminationListener);
}

//...
}
}

接着进入上面的newChild()方法,实际上是进入的NioEventLoop的方法

1
2
3
4
5
protected EventLoop newChild(Executor executor, Object... args) throws Exception {
EventLoopTaskQueueFactory queueFactory = args.length == 4 ? (EventLoopTaskQueueFactory)args[3] : null;
//实际上是创建了一个新的NioEventLoop
return new NioEventLoop(this, executor, (SelectorProvider)args[0], ((SelectStrategyFactory)args[1]).newSelectStrategy(), (RejectedExecutionHandler)args[2], queueFactory);
}

至此可以揭晓谜底了,线程池中的线程,那个实体指的就是NioEventLoop!所以我们整段代码看下来,可以得出结论,NioEventLoopGroup只是一个创建NioEventLoop的实体池,而很多构造方法里的参数最终也是要进入NioEventLoop进行使用。

其实我们看词义和继承关系也能看出个大概,NioEventLoop继承了MultithreadEventLoopGroup,而NioEventLoop继承了SingleThreadEventLoop,也是多和一的关系。

NioEventLoop

那接下来我们就要查看NioEventLoop的源码,康康里面究竟卖着什么葫芦药

首先看看它的构造方法

1
2
3
4
5
6
7
8
9
10
11
12
13
14
15
16
17
18
19
20
21
22
23
24
25
26
27
28

NioEventLoop(...) {
super(parent, executor, false, newTaskQueue(queueFactory), newTaskQueue(queueFactory), rejectedExecutionHandler);
//老面孔
this.provider = (SelectorProvider)ObjectUtil.checkNotNull(selectorProvider, "selectorProvider");
//老面孔
this.selectStrategy = (SelectStrategy)ObjectUtil.checkNotNull(strategy, "selectStrategy");
//selecor,重要的组件
NioEventLoop.SelectorTuple selectorTuple = this.openSelector();
this.selector = selectorTuple.selector;
this.unwrappedSelector = selectorTuple.unwrappedSelector;
}
//看一下父类的构造方法
protected SingleThreadEventLoop(...) {
super(parent, executor, addTaskWakesUp, taskQueue, rejectedExecutionHandler);
this.tailTasks = (Queue)ObjectUtil.checkNotNull(tailTaskQueue, "tailTaskQueue");
}
//看一下父类的构造方法
protected SingleThreadEventExecutor(...) {
//...
//老面孔
this.executor = ThreadExecutorMap.apply(executor, this);
//其中最重要的就是这个taskQueue,联想一下js中的Eventloop是不是也有这个东西?
//任务队列,提交给 NioEventLoop 的任务都会进入到这个 taskQueue 中等待被执行
this.taskQueue = (Queue)ObjectUtil.checkNotNull(taskQueue, "taskQueue");
//老面孔
this.rejectedExecutionHandler = (RejectedExecutionHandler)ObjectUtil.checkNotNull(rejectedHandler, "rejectedHandler");
}

发现了很多老面孔了,这些都是直接从外层传递进来的,但是也有一些比较重要的东西,比如selector,这是reactor的重要角色

现在我们其实对NioEventLoop的具体工作流程尚不了解,但是通过对构造函数的分析,相信大家也都明白了这个实体类的重要性。这里做一下总结,接下来会继续分析NioEventLoop的具体工作

  • 从构造上可以看出,NioEventLoop实际上是一个线程池,只不过是一个单线程的线程池,里面持有一个Selector,负责Reactor中最重要的角色
  • 我们利用NioEventLoopGroup构建NioEventLoopNioEventLoopGroup是一个NioEventLoop池,默认创建2*核心数NioEventLoop,同时,客户端创建一个NioEventLoopGroup,服务端创建两个NioEventLoopGroup,实际上是多reactor模型,对事件的接受和分发做解耦,这个之后回顾整体架构的时候再细说

执行

netty服务端的demo启动后,代码会执行到NioEventLooprun方法,让我们直接进入run方法查看eventloop是如何工作的:

1
2
3
4
5
6
7
8
9
10
11
12
13
14
15
16
17
18
19
20
21
22
23
24
25
26
27
28
29
30
31
32
33
34
35
36
37
38
39
40
41
42
43
44
45
46
47
48
49
50
51
52
53
54
55
56
57
58
59
60
61
62
63
64
65
66
67
68
69
70
71
72
73
74
75
76
77
78
79
80
protected void run() {
int selectCnt = 0;

while(true) {
while(true) {
while(true) {
try {
int strategy;
try {
//注意这里,这里的selectStrategy就是我们之前所提到的构造方法里的一个参数
//这里有三个值:-1代表 SELECT -2代表CONTINUE -3代表BUSY_WAIT
//
strategy = this.selectStrategy.calculateStrategy(this.selectNowSupplier, this.hasTasks());
switch(strategy) {
case -3:
case -1:
long curDeadlineNanos = this.nextScheduledTaskDeadlineNanos();
if (curDeadlineNanos == -1L) {
curDeadlineNanos = 9223372036854775807L;
}

this.nextWakeupNanos.set(curDeadlineNanos);

try {
if (!this.hasTasks()) {
strategy = this.select(curDeadlineNanos);
}
break;
} finally {
this.nextWakeupNanos.lazySet(-1L);
}
case -2:
continue;
}
} catch (IOException var38) {
this.rebuildSelector0();
selectCnt = 0;
handleLoopException(var38);
continue;
}

++selectCnt;
this.cancelledKeys = 0;
this.needsToSelectAgain = false;
///ioRatio 的默认值是50
int ioRatio = this.ioRatio;
boolean ranTasks;
if (ioRatio == 100) {
try {
if (strategy > 0) {
this.processSelectedKeys();
}
} finally {
ranTasks = this.runAllTasks();
}
} else if (strategy > 0) {
long ioStartTime = System.nanoTime();
boolean var26 = false;

try {
var26 = true;
this.processSelectedKeys();
var26 = false;
} finally {
if (var26) {
long ioTime = System.nanoTime() - ioStartTime;
this.runAllTasks(ioTime * (long)(100 - ioRatio) / (long)ioRatio);
}
}

long ioTime = System.nanoTime() - ioStartTime;
ranTasks = this.runAllTasks(ioTime * (long)(100 - ioRatio) / (long)ioRatio);
} else {
ranTasks = this.runAllTasks(0L);
}

//...
}
}
}

重点关注其中的一个 switch(strategy),一个 if (ioRatio == 100)

这里其实主要涉及到三个操作、

  • select():轮询,接受注册到reactor线程上的事件
  • processSelectedKeys():处理产生网络IO事件的channel
  • runAllTasks():处理任务队列

这三个操作就是NioEventLoop的核心操作,实际上就包含了channel的接受,分发和处理,下面就分别介绍一下这三个操作

select()

截取run方法中的一部分

1
2
3
4
5
6
7
8
9
10
11
12
13
14
15
16
17
18
19
switch(strategy) {
//这里有三个值:-1代表 SELECT -2代表CONTINUE -3代表BUSY_WAIT
case -1:
long curDeadlineNanos = this.nextScheduledTaskDeadlineNanos();
if (curDeadlineNanos == -1L) {
curDeadlineNanos = 9223372036854775807L;
}

this.nextWakeupNanos.set(curDeadlineNanos);

try {
if (!this.hasTasks()) {
strategy = this.select(curDeadlineNanos);
}
break;
} finally {
this.nextWakeupNanos.lazySet(-1L);
}
}

这里主要关注select分支,首先要注意的是select是一个阻塞方法,返回值表示多少channel准备就绪,可以进入处理。

看一看select前后处理逻辑,首先设置当前最迟的轮询时间,然后进入select方法

1
2
3
4
5
6
7
8
9
private int select(long deadlineNanos) throws IOException {
if (deadlineNanos == 9223372036854775807L) {
return this.selector.select();
} else {
//设置边界时间为0.995s
long timeoutMillis = deadlineToDelayNanos(deadlineNanos + 995000L) / 1000000L;
return timeoutMillis <= 0L ? this.selector.selectNow() : this.selector.select(timeoutMillis);
}
}

netty里面定时任务队列是按照延迟时间从小到大进行排序,每次获取任务都是从延迟时间最小的开始获取。select就是通过判断是否有任务正在排队来决定是否进行select

这里,如果时间小于0.995s,表示截止事件时间快到了,那就立刻select一次,调用selectNow()方法。

其中还设置了下一次唤醒时间,如果截止时间到了但是任务还没有被处理,就会自动唤醒

·

processSelectedKeys()

让我们进入processSelectedKeys()方法看看里面干了什么

1
2
3
4
5
6
7
8
9
10
private void processSelectedKeys() {
if (this.selectedKeys != null) {
//处理优化过的SelectionKey
this.processSelectedKeysOptimized();
} else {
//处理正常情况的SelectionKey
this.processSelectedKeysPlain(this.selector.selectedKeys());
}

}

我们知道SelectionKey代表事件返回的对象,里面有感兴趣事件集合,准备就绪的事件集合,channelselectorattachment

优化过的SelectionKey和正常的SelectionKey的区别在于netty重写了SelectedSelectionKeySetselectedKeys属性和publicSelectedKeys属性,使得原来的set变成数组,降低了修改元素的事件复杂度。

看一下processSelectedKeysOptimized()的代码:

1
2
3
4
5
6
7
8
9
10
11
12
13
14
15
16
17
18
19
20
21
22
23
24
private void processSelectedKeysOptimized() {
for(int i = 0; i < this.selectedKeys.size; ++i) {
//取出IO事件和channel
SelectionKey k = this.selectedKeys.keys[i];
this.selectedKeys.keys[i] = null;
//获取selectoinKey中的attachment
Object a = k.attachment();
//attachment一般是AbstractNioChannel,存放着具体IO事件
if (a instanceof AbstractNioChannel) {
this.processSelectedKey(k, (AbstractNioChannel)a);
} else {
NioTask<SelectableChannel> task = (NioTask)a;
processSelectedKey(k, task);
}

//部分情况可能出现需要再次轮询的情况
if (this.needsToSelectAgain) {
this.selectedKeys.reset(i + 1);
this.selectAgain();
i = -1;
}
}

}

什么时候需要再次轮询?

  • channelselector上移除的时候,调用cancel函数将key取消,并且当被去掉的key到达 CLEANUP_INTERVAL 的时候,设置needsToSelectAgaintrue,CLEANUP_INTERVAL默认值为256
  • 因此每满256次会将selectedKeys的内部数组全部清空,然后重新selectAgain重新装载selectionKey

runTasks()

先看run方法的代码片段

1
2
3
4
5
6
7
8
9
10
11
12
13
14
15
16
17
18
19
20
21
22
23
24
25
26
27
28
29
30
31
32
33
34
					++selectCnt;
this.cancelledKeys = 0;
this.needsToSelectAgain = false;
//ioRatio是 IO 任务的执行时间比例,如果等于100表示所有时间都被用来处理io任务,默认是50
int ioRatio = this.ioRatio;
boolean ranTasks;
if (ioRatio == 100) {
try {
if (strategy > 0) {
this.processSelectedKeys();
}
} finally {
ranTasks = this.runAllTasks();
}
} else if (strategy > 0) {
long ioStartTime = System.nanoTime();
boolean var26 = false;

try {
var26 = true;
this.processSelectedKeys();
var26 = false;
} finally {
if (var26) {
long ioTime = System.nanoTime() - ioStartTime;
this.runAllTasks(ioTime * (long)(100 - ioRatio) / (long)ioRatio);
}
}

long ioTime = System.nanoTime() - ioStartTime;
ranTasks = this.runAllTasks(ioTime * (long)(100 - ioRatio) / (long)ioRatio);
} else {
ranTasks = this.runAllTasks(0L);
}
  • 如果ioRatio100同时就直接执行IO操作,并最后处理返回的任务
  • 如果ioRatio不是100 就计算io处理限制时间,设置处理返回任务的截止时间,让处理I/O事件的时间和执行任务的时间为1:1。

再看runAllTasks的实现之前,先要明白task究竟是什么。在netty中一共有两种任务,一种是普通任务,一种是定时任务。这里先抛出结论:普通任务存放在taskQueue中,定时任务存放在PriorityQueue中,这部分的代码追踪暂时就不写出来了,让我们首先关注如何去运行致谢tasks

进入runAllTasks()看一下:

1
2
3
4
5
6
7
8
9
10
11
12
13
14
15
16
17
18
19
20
21
22
23
24
25
26
27
28
29
30
31
32
33
34
35
36
37
38
protected boolean runAllTasks(long timeoutNanos) {
//等会讲
this.fetchFromScheduledTaskQueue();
//从队列中取出任务
Runnable task = this.pollTask();
if (task == null) {
this.afterRunningAllTasks();
return false;
} else {
long deadline = timeoutNanos > 0L ? ScheduledFutureTask.nanoTime() + timeoutNanos : 0L;
long runTasks = 0L;

long lastExecutionTime;
while(true) {
//处理任务,这里的task其实就是一个Runnable类,方法里直接run就行了
safeExecute(task);
//记录处理完的任务数
++runTasks;
//每64个任务才检查一次timeout,因为nanoTime()开销比较大
if ((runTasks & 63L) == 0L) {
lastExecutionTime = ScheduledFutureTask.nanoTime();
if (lastExecutionTime >= deadline) {
break;
}
}
//继续处理下一个任务
task = this.pollTask();
if (task == null) {
lastExecutionTime = ScheduledFutureTask.nanoTime();
break;
}
}

this.afterRunningAllTasks();
this.lastExecutionTime = lastExecutionTime;
return true;
}
}

整体逻辑还算简单,主要先看看fetchFromScheduledTaskQueue()里面做了什么

1
2
3
4
5
6
7
8
9
10
11
12
13
14
15
16
17
18
19
20
private boolean fetchFromScheduledTaskQueue() {
if (this.scheduledTaskQueue != null && !this.scheduledTaskQueue.isEmpty()) {
long nanoTime = AbstractScheduledEventExecutor.nanoTime();

Runnable scheduledTask;
do {
//在定时任务队列中获取一个离截止时间最近的任务
scheduledTask = this.pollScheduledTask(nanoTime);
if (scheduledTask == null) {
return true;
}//添加普通队列中去
} while(this.taskQueue.offer(scheduledTask));

//如果添加失败,就归还定时任务
this.scheduledTaskQueue.add((ScheduledFutureTask)scheduledTask);
return false;
} else {
return true;
}
}

之前说过task包含普通任务和定时任务,分别处在不同的队列中。可见这个函数的主要作用就是将定时任务添加到普通队列中去,这样后面处理任务的时候就可以统一一个队列中获取。

为什么是放在普通队列中?因为定时队列是按照时间优先级的顺序排列,普通任务也无法正常的插入定时任务队列,反之快到截止时间的定时任务是可以看作是普通任务来处理的。

到这里runTasks的逻辑也基本讲完了。总结一下主要干了这些事

  • 协调IO时间和处理任务的时间,计算处理任务需要的deadline截止时间
  • 聚合定时任务和普通任务,循环取出任务执行
  • 每执行64次任务就检查一次截止时间,到期退出循环
  • afterRunningAllTasks()中,做一些收尾动作

总结

至此,EventLoop上的所有任务都开始执行了,整个流程也结束了。·

最后让我们看看reactor模式及对应下各个角色的具体实现,让我们再看一眼

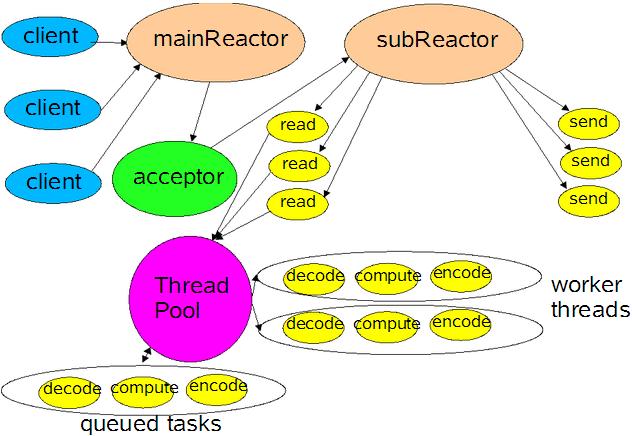
Reactor线程模型的主要实现实体:NioEventLoop

client: 请求的事件,可以理解是一个channel

acceptorselector,主要指selectorselect()负责的监听并接受事件

mainReactorsunReactor:在服务端会绑定两个NioEventLoopGroupparentGroupchildGroup,一般在parentGroup中处理accept事件,再childGroup中处理其他事件。IO事件的处理主要是在processSelectedKeys()函数里,判断SelectionKey的类型,并交给不同的函数处理。

queued tasks:当建立了连接后,待处理任务就会进入tasks queue,等到再runTasks()中循环队列处理,每个任务对应从threadpool中取出一条worker thread进行处理

参考博客

【NIO系列】——之Reactor模型

Java NIO浅析-美团技术团队

分享到: